Skip to main content More Related Content

PDF

PDF

PDF
MT meets PHP - PHP conference Kansai 2013 
PDF

PDF

PDF
deviseを利用した認証について@Minamirb 
PDF
jQuery Mobile 1.2 最新情報 & Tips 
PDF
Similar to 日本Androidの会 中国支部資料

PDF

PDF
Android Lecture #04 @PRO&BSC Inc. 
PDF

PDF
Android Lecture #01 @PRO&BSC Inc. 
PDF
![[ABC2012S]Android2x/3x/4x対応アプリ開発Tips](/proxy?url=https%3A%2F%2Fcdn.slidesharecdn.com%2Fss_thumbnails%2Fabc2012sandroid234kanbara-120324082804-phpapp02-thumbnail.jpg%3Fwidth%3D640%26height%3D640%26fit%3Dbounds)
KEY
[ABC2012S]Android2x/3x/4x対応アプリ開発Tips 
ODP

PDF

PDF
夜子まま塾講義8(androidの画面デザイン2) 
PDF
Android Lecture #02 @PRO&BSC Inc. 
PPTX

PDF

PDF

PDF
デザイナーが実際にAndroidアプリのレイアウトを 組んでみた(秋葉ちひろ) 
PDF
Android Lecture #03 @PRO&BSC Inc. 
ODP

ODP

PDF
Androidアプリの魅力的なインターフェース〜本当にiOSアプリのデザインを流用するだけでいいの?〜 
PDF
みゆっき☆Think#3 「androidに触ってみるよ!」 
PPTX
More from Masafumi Terazono

PPTX
マイクラシナリオメーカー(仮)の紹介をするワークショップのスライド version1.0 
PDF

PPTX

PPTX

PPTX

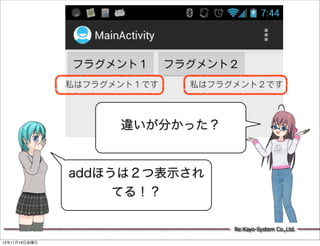
PPTX
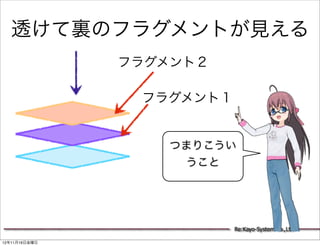
Kobe.py 勉強会 minecraft piスライド 
PPTX
Minecraftと連携するSlackちゃんという会話Botを作った話 
PDF
初心者〜中級者 Android StudioによるAndroid勉強会資料(スライド) 
PDF

PDF

PDF

PDF

PDF

PDF

PDF

PDF
Android+NFC 日本Androidの会神戸支部 勉強会 
PDF

PDF

PDF
夜子まま塾講義12(broadcast reciever) 
PDF
夜子まま塾講義7(androidの画面デザイン1) 日本Androidの会 中国支部資料
- 1.
尾道にて
Now Loading. Please Wait ...
Twitter @yokmama
最新Androidアプリ開発の心得
夜子まま 日本Androidの会神戸支部
http://www.slideshare.net/yokmama/android-15186487
Re:Kayo-System Co.,Ltd.
12年11月16日金曜日
- 2.
自己紹介
本名 :寺園聖文(てらぞの まさふみ)
別名 :夜子まま
肩書 :株式会社Re:Kayo-System 代表取締役社長
クラスタ:日本Androidの会、関西Unity、NFCLab
Re:Kayo-System Co.,Ltd.
12年11月16日金曜日
- 3.
著書
10日でおぼえる Androidアプリ開発入門教室
Androidタブレットアプリ開発ガイド
Android SDK 3対応
HTML5によるAndroidアプリ開発入門
10日でおぼえるAndroidアプリ開発入門
教室 第2版 AndroidSDK 4/3/2対応
Re:Kayo-System Co.,Ltd.
12年11月16日金曜日
- 4.
- 5.
猫語にゃん
Re:Kayo-System Co.,Ltd.
12年11月16日金曜日
- 6.
Skip Memo
Re:Kayo-System Co.,Ltd.
12年11月16日金曜日
- 7.
JUST PLAYER
http://justplayer-dev.blogspot.jp/
Re:Kayo-System Co.,Ltd.
12年11月16日金曜日
- 8.
講義の内容
以前のUI開発
最近のUI開発
まとめ
Re:Kayo-System Co.,Ltd.
12年11月16日金曜日
- 9.
以前のUI開発
Re:Kayo-System Co.,Ltd.
12年11月16日金曜日
- 10.
UI作成のフロー
レイアウトファイル
Activityクラス
AndroidManifest.xml
Re:Kayo-System Co.,Ltd.
12年11月16日金曜日
- 11.
煩雑なレイアウトファイル
<?xml version="1.0" encoding="utf-8"?>
<FrameLayout xmlns:android="http://schemas.android.com/apk/res/android"
android:layout_width="match_parent"
android:layout_height="match_parent"
android:gravity="center_horizontal"
android:orientation="vertical" >
<ImageView
android:id="@+id/imageAlbumArt"
android:layout_width="fill_parent"
android:layout_height="fill_parent"
android:layout_gravity="top"
android:focusable="false"
android:gravity="top"
android:layout_margin="5dip"
android:scaleType="fitStart" />
<LinearLayout
android:layout_width="fill_parent"
android:layout_height="wrap_content"
android:layout_gravity="center_horizontal|bottom"
android:clickable="true"
android:orientation="vertical" >
<TextView
android:id="@+id/textTitle"
android:layout_width="wrap_content"
android:layout_height="wrap_content"
android:layout_gravity="center_horizontal"
android:layout_marginLeft="10dip"
android:layout_marginRight="10dip"
android:ellipsize="end"
android:singleLine="true"
android:text="title"
android:textColor="@color/white"
android:textSize="20sp" />
<TextView
android:id="@+id/textArtist"
android:layout_width="wrap_content"
android:layout_height="wrap_content"
android:layout_gravity="center_horizontal"
android:layout_marginLeft="10dip"
android:layout_marginRight="10dip"
android:ellipsize="end"
android:singleLine="true"
android:text="artist"
android:textSize="20sp" />
・
・
</FrameLayout>
・
Re:Kayo-System Co.,Ltd.
12年11月16日金曜日
- 12.
煩雑な管理
Activity用のレイアウト
要素単位のレイアウト
端末種別毎のレイアウト
・
・
・
Re:Kayo-System Co.,Ltd.
12年11月16日金曜日
- 13.
煩雑なクラス
初期化処理
public class MainActivity extends Activity implements OnClickListener {
public static final String CNF_PASS_LOOP = "chkPassLoop";
public static final String CNF_WIFI_ONLY = "chkWIFIOnly";
private final String KEY_CONFIG_HISTORY = "KEY_CONFIG_HISTORY";
private final int MAX_INSTANCE = 5;
private
private
private
SharedPreferences mPref;
EditText mEditHost;
EditText mEditUsername;
イベント処理
private EditText mEditPassword;
private CheckBox mChkPassLoop;
一次保存処理
private CheckBox mChkWIFIOnly;
private Spinner mSpinner;
private Button mBtnConnect;
private void btnStateCheck() {
mBtnConnect.setText(R.string.txt_connect);
Button btnAllSync = (Button) findViewById(R.id.btnAllSync);
Button btnMediaSync = (Button) findViewById(R.id.btnMediaSync);
Button btnVideosSync = (Button) findViewById(R.id.btnVideosSync);
非同期処理
btnMediaSync.setEnabled(false);
btnVideosSync.setEnabled(false);
btnAllSync.setEnabled(false);
・
}
・
private void btnStateOk() {
mBtnConnect.setText(R.string.txt_connected); ・
Button btnAllSync = (Button) findViewById(R.id.btnAllSync);
Button btnMediaSync = (Button) findViewById(R.id.btnMediaSync);
Button btnVideosSync = (Button) findViewById(R.id.btnVideosSync);
btnMediaSync.setEnabled(true);
btnVideosSync.setEnabled(true);
btnAllSync.setEnabled(true);
}
・
・
・
}
Re:Kayo-System Co.,Ltd.
12年11月16日金曜日
- 14.
煩雑な
AndroidManifest.xml
<application android:debuggable="false"
android:hardwareAccelerated="false" android:icon="@drawable/appicon"
android:label="@string/app_name">
<provider android:name=".provider.MediaContentProvider"
android:authorities="jp.co.kayo.android.localplayer" />
<provider android:name=".provider.DeviceContentProvider"
android:authorities="jp.co.kayo.android.localplayer.media" />
<provider android:name=".provider.LocalSuggestionProvider"
android:authorities="jp.co.kayo.android.localplayer.provider.localsuggestion"
android:syncable="false" />
<activity android:name=".MainActivity2" android:label="@string/app_name"
android:launchMode="singleTop">
<intent-filter>
<action android:name="android.intent.action.MAIN" />
<category android:name="android.intent.category.LAUNCHER" />
</intent-filter>
<intent-filter>
<action android:name="android.intent.action.SEARCH" />
<category android:name="android.intent.category.DEFAULT" />
</intent-filter>
<meta-data android:name="android.app.searchable"
android:resource="@xml/searchable" />
</activity>
<activity android:name=".pref.PremiumConfigPreference"
android:label="@string/app_name" />
<activity android:name=".pref.CacheConfigPreference"
android:label="@string/app_name" />
<activity android:name=".pref.BeamConfigPreference"
android:label="@string/app_name" /> AndroidManifest.xml
・
・
</application>
・
Re:Kayo-System Co.,Ltd.
12年11月16日金曜日
- 15.
多様な端末
http://developer.android.com/about/dashboards/index.html
Re:Kayo-System Co.,Ltd.
12年11月16日金曜日
- 16.
肥大化する定義ファイル
layout-xlarge
layout-land
layout-hdpi
layout-large
layout-xlarge
layout-v11
Re:Kayo-System Co.,Ltd.
12年11月16日金曜日
- 17.
どうすればいい?
Re:Kayo-System Co.,Ltd.
12年11月16日金曜日
- 18.
最近のUI開発
Re:Kayo-System Co.,Ltd.
12年11月16日金曜日
- 19.
Fragment
Re:Kayo-System Co.,Ltd.
12年11月16日金曜日
- 20.
- 21.
Activity フラグメント
フラグメント
フラグメント
Re:Kayo-System Co.,Ltd.
12年11月16日金曜日
- 22.
Activity
フラグメント
フラグメント
フラグメント
Re:Kayo-System Co.,Ltd.
12年11月16日金曜日
- 23.
Activity FragmentManager
Fragment FragmentTransaction
Re:Kayo-System Co.,Ltd.
12年11月16日金曜日
- 24.
Activity Activity Activity
フラグメント フラグメント フラグメント
1 2 1
Backボタン
FragmentはBackボタン等で取り外す
ことができるのでActivityみたいな動き
をするのよ
Re:Kayo-System Co.,Ltd.
12年11月16日金曜日
- 25.
addToBackStack
持ち主:FragmentTransaction
public abstract FragmentTransaction addToBackStack (String name)
パラメーター
name
オプションとしてnullまたはスタックされる状態の名前
addToBackStackは複数のFragment
を一つの画面の状態として
FragmentManagerに登録(スタッ
ク)するメソッドよ。
Re:Kayo-System Co.,Ltd.
12年11月16日金曜日
- 26.
スタックのイメージ
Fragment
FragmentTransaction
Stack Stack Stack
FragmentManager
Re:Kayo-System Co.,Ltd.
12年11月16日金曜日
- 27.
使用例
FragmentTransactiont = getFragmentManager().beginTransaction();
t.add(R.id.framelayout1, new Fragment1(), null);
t.addToBackStack("SUB_VIEW");
t.commit();
Fragmentは複数表示された状態を保存で
きるようにするため、操作のはじめと終わ
りをトランザクションで指定するのよ
Re:Kayo-System Co.,Ltd.
12年11月16日金曜日
- 28.
popBackStack
持ち主:FragmentManager
public abstract void popBackStack ()
スタックに追加されたFragmentは
Backボタンか、このpopBackStackメ
ソッドでもとに戻すことができるのよ
Re:Kayo-System Co.,Ltd.
12年11月16日金曜日
- 29.
スタックのイメージ
Stack
Stack Stack
FragmentManager
Re:Kayo-System Co.,Ltd.
12年11月16日金曜日
- 30.
持ち主:FragmentManager
public abstract void popBackStack (String name, int flags)
パラメーター
name
nullでない場合、指定された名前の位置までスタックを取り除きます。
POP_BACK_STACK_INCLUSIVEフラグは指定された名前のスタックまで取り除く
かどうかを指定するフラグです。
flags
0または POP_BACK_STACK_INCLUSIVE.
Fragmentをスタックに追加するときに名前
を設定していたら、このpopBackStackで、
指定した名前まで戻すことができます。
Re:Kayo-System Co.,Ltd.
12年11月16日金曜日
- 31.
Practice
OK!
早速、 フラグメント
使い方を教えてよ! ーマスター
の技を見せて
あげるわ
Re:Kayo-System Co.,Ltd.
12年11月16日金曜日
- 32.
Fragmentの設定
フラグメント
ホストの
Activity
フラグメントの
レイアウトファイル
ホストの
レイアウトファイル
エントリーポイント
Re:Kayo-System Co.,Ltd.
12年11月16日金曜日
- 33.
ホストのレイアウトファイル
<LinearLayout
xmlns:android="http://schemas.android.com/apk/res/android"
・・・省略・・・
<FrameLayout
android:id="@+id/framelayout1"
android:layout_width="fill_parent"
android:layout_height="fill_parent" />
</LinearLayout>
エントリーポイント
フラグメント追加
FragmentTransaction t = getFragmentManager().beginTransaction();
t.add(R.id.framelayout1, new Fragment1(), null);
t.addToBackStack(null);
t.commit();
Re:Kayo-System Co.,Ltd.
12年11月16日金曜日
- 34.
ついでに・・・・
<fragment
android:name="ykmjuku.android.fragmentsample.Fragment1"
android:layout_width="match_parent"
android:layout_height="match_parent" />
直接書くことも可能。
だけど、エントリーポイントがな
いので変更できないよ!
Re:Kayo-System Co.,Ltd.
12年11月16日金曜日
- 35.
- 36.
add
addはFragmentを追加します
Fragment
Fragment
Fragment
エントリーポイント
Re:Kayo-System Co.,Ltd.
12年11月16日金曜日
- 37.
持ち主:FragmentTransaction
public abstract FragmentTransaction add (int containerViewId, Fragment fragment,
String tag)
パラメーター
containerViewId
フラグメントを設定するエントリーポイントのIDです。エントリーポイントは
ViewGroupである必要があります。0を指定するとエントリーポイント無しで追加され
ます
fragment
追加するフラグメント
tag
追加するフラグメントの名称です。nullを指定することもできます。
戻り値
FragmentTransactionのインスタンス
Re:Kayo-System Co.,Ltd.
12年11月16日金曜日
- 38.
replace
replaceは指定した位置の
Fragmentと入れ替えます
Fragment
Fragment
エントリーポイント
Re:Kayo-System Co.,Ltd.
12年11月16日金曜日
- 39.
持ち主:FragmentTransaction
public abstract FragmentTransaction replace (int containerViewId, Fragment fragment,
String tag)
パラメーター
containerViewId
置き換えをしたいフラグメントが設定されているエントリーポイントのID
fragment
置き換えるフラグメント
tag
追加するフラグメントの名称です。nullを指定することもできます。
戻り値
FragmentTransactionのインスタンス
Re:Kayo-System Co.,Ltd.
12年11月16日金曜日
- 40.
remove
removeは今いるFragmentを削
除します
Fragment
Fragment
エントリーポイント
Re:Kayo-System Co.,Ltd.
12年11月16日金曜日
- 41.
持ち主:FragmentTransaction
public abstract FragmentTransaction remove (Fragment fragment)
パラメーター
fragment
削除したいフラグメント
戻り値
FragmentTransactionのインスタンス
Re:Kayo-System Co.,Ltd.
12年11月16日金曜日
- 42.
addとreplaceの違い
replaceは削除して追加した状
態です。
Fragment
Fragment Fragment
エントリーポイント エントリーポイント
Re:Kayo-System Co.,Ltd.
12年11月16日金曜日
- 43.
Fragmentの状態
FragmentManagerの内部では
Fragmentは取り付けた状態とそうでない
状態で分けているので、実際は削除して
もホントに削除される分けじゃないの。
へぇ、そうなんやぁ
Re:Kayo-System Co.,Ltd.
12年11月16日金曜日
- 44.
ライフサイクルで比較
add PAUSE
INIT
IDLE DESTROY
replace
Re:Kayo-System Co.,Ltd.
12年11月16日金曜日
- 45.
だから、replaceは復帰時に
OnCreateが呼ばれるので注意してね
そ、そんなぁー
それじゃadd使うほうが
得やない?
Re:Kayo-System Co.,Ltd.
12年11月16日金曜日
- 46.
そう思うでしょ?
だから次のようなテストをしてみたので、
違いをみてみて
Re:Kayo-System Co.,Ltd.
12年11月16日金曜日
- 47.
addとreplaceで
比較できるアプリを作っ
エントリーポイント てみたわ
Fragment1 Fragment2
Re:Kayo-System Co.,Ltd.
12年11月16日金曜日
- 48.
- 49.
addの場合
Re:Kayo-System Co.,Ltd.
12年11月16日金曜日
- 50.
違いが分かった?
addほうは2つ表示され
てる!?
Re:Kayo-System Co.,Ltd.
12年11月16日金曜日
- 51.
透けて裏のフラグメントが見える
フラグメント2
フラグメント1
つまりこうい
うこと
Re:Kayo-System Co.,Ltd.
12年11月16日金曜日
- 52.
これじゃ、add使い物に
ならないじゃない!
そう、はっきりいって使えな
い、、だけどちょっと工夫すれ
ば使えるよ!
Re:Kayo-System Co.,Ltd.
12年11月16日金曜日
- 53.
見せたくないのはhideで消
せばいいの
コレ!
Fragment current =
getFragmentManager().findFragmentById(R.id.framelayout1);
FragmentTransaction t = getFragmentManager().beginTransaction();
t.add(R.id.framelayout1, new Fragment1(), null);
t.addToBackStack(null);
t.hide(current);
t.commit();
Re:Kayo-System Co.,Ltd.
12年11月16日金曜日
- 54.
- 55.
そんな、簡単な方法があるなら最初から
教えてくれたってもええやんか。
あぁーー、でも実はこれには罠があって
実はこれだけじゃダメなんだよねぇー
Re:Kayo-System Co.,Ltd.
12年11月16日金曜日
- 56.
回転してみた
Re:Kayo-System Co.,Ltd.
12年11月16日金曜日
- 57.
!?
ね?ダメでしょ
あわわわ、
復活してるわ!
Re:Kayo-System Co.,Ltd.
12年11月16日金曜日
- 58.
- 59.
それで、回転して戻った時に
FragmentManagerはFragmentの
位置は戻すけど、状態までは戻して
くれないの
そ、そんなぁー
それ、バグじゃないの?
Re:Kayo-System Co.,Ltd.
12年11月16日金曜日
- 60.
残念ながら、バグじゃなくて仕様
なんですよねぇ、だからその回避
策を伝授してあげるわ。
おっけー!
まかせた
Re:Kayo-System Co.,Ltd.
12年11月16日金曜日
- 61.
その1
Re:Kayo-System Co.,Ltd.
12年11月16日金曜日
- 62.
1.回転を固定
<activity android:name="MainActivity"
android:label="@string/app_name"
android:screenOrientation="portrait"/>
または
@Override
public void onCreate(Bundle savedInstanceState)
{
super.onCreate(savedInstanceState);
setRequestedOrientation(
ActivityInfo.SCREEN_ORIENTATION_PORTRAIT);
setContentView(R.layout.main);
}
Re:Kayo-System Co.,Ltd.
12年11月16日金曜日
- 63.
その2
Re:Kayo-System Co.,Ltd.
12年11月16日金曜日
- 64.
2.背景を塗りつぶす
<LinearLayout
android:layout_width="match_parent"
android:layout_height="match_parent"
android:background="@android:color/white"
android:orientation="vertical" >
Re:Kayo-System Co.,Ltd.
12年11月16日金曜日
- 65.
その3
Re:Kayo-System Co.,Ltd.
12年11月16日金曜日
- 66.
3.再表示時に再度hideを設定する
@Override
public void onActivityCreated(Bundle savedInstanceState) {
super.onActivityCreated(savedInstanceState);
if (savedInstanceState != null) {
boolean isHiddin = savedInstanceState.getBoolean("isHidden");
if (isHiddin) {
FragmentTransaction t = getFragmentManager().beginTransaction();
t.hide(this);
t.commit();
}
}
}
@Override
public void onSaveInstanceState(Bundle outState) {
// TODO Auto-generated method stub
super.onSaveInstanceState(outState);
outState.putBoolean("isHidden", isHidden());
}
Re:Kayo-System Co.,Ltd.
12年11月16日金曜日
- 67.
なるほどー
これならフラグメントも使えるね
そうそう、フラグメントはすっごい簡単
だし、使いこなすと次のようなメリット
があるのよ
Re:Kayo-System Co.,Ltd.
12年11月16日金曜日
- 68.
レイアウトファイルが
すっきり
画面単位で作成さ
画面1つと、複数
れたレイアウトフ
の機能単位で作成
ァイル郡
Re:Kayo-System Co.,Ltd.
12年11月16日金曜日
- 69.
Javaファイルが
すっきり
1つのActivityと複
1つのActivity
数のFragment
Re:Kayo-System Co.,Ltd.
12年11月16日金曜日
- 70.
- 71.
- 72.
values
でもさぁ、
端末が増えていく度に増える設定ファ
イルはフラグメントだけじゃ解決しな
いんじゃない?
そうなの、フラグメントはあくまで整理
整頓しやすくなるというだけで、これか
ら説明するvaluesを活用するといいよ
Re:Kayo-System Co.,Ltd.
12年11月16日金曜日
- 73.
normal small
<TextView <TextView
android:id="@+id/textView1" android:id="@+id/textView1"
android:layout_width="wrap_content" android:layout_width="wrap_content"
android:layout_height="wrap_content" android:layout_height="wrap_content"
android:layout_alignParentLeft="true" android:layout_alignParentLeft="true"
android:layout_alignParentTop="true" android:layout_alignParentTop="true"
android:textSize="20sp" android:textSize="18sp"
android:layout_marginLeft="5dip" android:layout_marginLeft="5dip"
android:text="TextView" /> android:text="TextView" />
<TextView <TextView
android:id="@+id/textView2" android:id="@+id/textView2"
android:layout_width="wrap_content" android:layout_width="wrap_content"
android:layout_height="wrap_content" android:layout_height="wrap_content"
android:layout_below="@+id/textView1" android:layout_below="@+id/textView1"
android:layout_marginLeft="15dip" android:layout_marginLeft="15dip"
android:textSize="18sp" android:textSize="12sp"
android:text="TextView" /> android:text="TextView" />
Re:Kayo-System Co.,Ltd.
12年11月16日金曜日
- 74.
固有の値を直書きするのは止めよう
layout-hdpi layout-finger
layout-mdpi layout-land
layout-ldpi layout-portrait
layout-small layout-small
layou-large layou-xhdpi
layout-xlarge layout-v11
・・・
Re:Kayo-System Co.,Ltd.
12年11月16日金曜日
- 75.
値はvaluesで定義
values-ldpi
<dimen name="scaleX">5px</dimen>
values-mdpi
<dimen name="scaleX">10px</dimen>
レイアウトファイル
values-hdpi
<dimen name="scaleX">12px</dimen>
values-xdpi
<dimen name="scaleX">14px</dimen>
Re:Kayo-System Co.,Ltd.
12年11月16日金曜日
- 76.
機種毎のレイアウトを減らす
layout-hdpi
layout-mdpi
layout-ldpi layout
layout-small layout-land
layout-land layout-xlarge
layout-smal-land layout-xlarge-land
layou-large
layout-xlarge
Re:Kayo-System Co.,Ltd.
12年11月16日金曜日
- 77.
おぉ、valuesで値を定義したら端
末が増えてもレイアウトを追加したり
しなくても済むんだね!
そう!
あと、valuesの他にもうひとつstyleを
使えば完璧よ!
Re:Kayo-System Co.,Ltd.
12年11月16日金曜日
- 78.
style
styleってテーマとか標準のViewをカ
スタマイズするときに使うやつ?
そう、でもねもっと使いこなせばいろん
な設定がStyleでできちゃうのよ
Re:Kayo-System Co.,Ltd.
12年11月16日金曜日
- 79.
例えば、こういうTextView
<TextView
android:id="@+id/textView1"
android:layout_width="wrap_content"
android:layout_height="wrap_content"
android:layout_gravity="left¦top"
android:textColor="#696969"
android:text="色を変更したテキスト" />
<TextView
android:id="@+id/textView2"
android:layout_width="wrap_content"
android:layout_height="wrap_content"
android:layout_gravity="left¦top"
android:textColor="#696969"
android:textStyle="bold"
android:text="色とスタイルを変更したテキスト" />
Re:Kayo-System Co.,Ltd.
12年11月16日金曜日
- 80.
- 81.
attrとstyle
attr value
attr value
style
attr value
Re:Kayo-System Co.,Ltd.
12年11月16日金曜日
- 82.
attrの定義
例
<declare-styleable name="MyTheme">
<attr name="listTextColor1" format="color"></attr>
<attr name="textStyle1" format="reference"></attr>
</declare-styleable>
format:
"string", "integer", "float", "boolean", "color","dimension", "reference"
他のStyleを参照する属性は
referenceを指定してね
Re:Kayo-System Co.,Ltd.
12年11月16日金曜日
- 83.
styleの定義
<style name="MyText" parent="@android:style/TextAppearance">
<item name="android:textColor">@color/darkgray</item>
<item name="android:textStyle">bold</item>
</style>
<style name="AppTheme" parent="android:Theme.Light">
<item name="listTextColor1">@color/dimgray</item>
<item name="textStyle1">@style/MyText<attr></attr></item>
</style>
styleではattrで定義された
属性を設定できるよ
Re:Kayo-System Co.,Ltd.
12年11月16日金曜日
- 84.
すごい、Fragmentとvaluesとstyleを
つかえばすごくすっきりするね!
そうなの、Androidは機種対応がとても
多いからこういう工夫をすることで色々
な端末にも対応できるようにするのが大
事なのよ
Re:Kayo-System Co.,Ltd.
12年11月16日金曜日
- 85.
Drawable
最後にDrawableについてもいわせ
てもらうわ
たのむ!
Re:Kayo-System Co.,Ltd.
12年11月16日金曜日
- 86.
- 87.
まとめ
Re:Kayo-System Co.,Ltd.
12年11月16日金曜日
- 88.
レイアウトとクラスを機
能毎に分け整理するため
にFragmentを使う
Re:Kayo-System Co.,Ltd.
12年11月16日金曜日
- 89.
固定の値を直接レイアウ
トで使用せずvaluesを利
用する。
Re:Kayo-System Co.,Ltd.
12年11月16日金曜日
- 90.
- 91.
APKのサイズが大きくな
らないよう無駄なリソー
スを作らない
Re:Kayo-System Co.,Ltd.
12年11月16日金曜日
- 92.
- 93.
すからじお
オンラインAndroid勉強会
(ACE資格勉強会)
毎週水曜日 夜10時∼
アクセス方法は下のURLから
https://plus.google.com/
117636937254190602510/posts
Re:Kayo-System Co.,Ltd.
12年11月16日金曜日