Use Step Sequencer edit modes in Logic Pro for iPad
In Step Sequencer in Logic Pro for iPad, you can use edit modes to control different aspects of the event triggered by a step. You can choose the edit mode for a pattern and use subrows to view multiple edit modes for each row. Some edit modes are common to both note rows and automation rows, and others are specific to one row type.
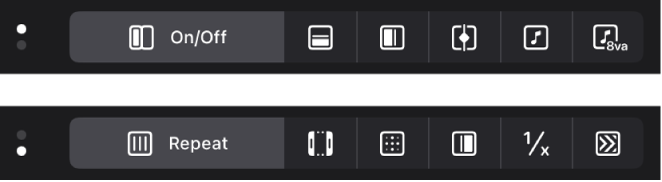
The Edit Mode buttons in the middle of the Step Sequencer menu bar control the edit mode for all rows in the pattern. Tap the Page Switch button ![]() to alternate between the two rows of buttons.
to alternate between the two rows of buttons.
Edit modes for both row types
On/Off: Tap steps to turn them on or off. Active steps appear highlighted in the step grid, while inactive steps appear darker.
Tie: Tap the right edge of a step to tie it to the following step, or tap the left edge to tie it to the previous step. The duration of the step is lengthened by the value of the step it is tied to.
Loop: When this mode is active, a frame appears around the row. Drag the left edge of the frame to set the start of the row relative to the overall pattern. Drag the right edge of the frame to set the end of the row relative to the overall pattern. You can also tap a step to set the start or end point (whichever is closest) to that step, and drag vertically to other rows to set their start or end positions.
Chance: Drag vertically in the step to set the chance percentage. Chance controls the probability that the step plays each time the pattern repeats. The active state of the step is determined when you edit the chance value and does not change until you edit it again.
Start: Drag vertically in the step to move the start offset of the step from –50 to +50 percent of the step rate.
Step Rate: Drag vertically in the step to set the length of the step (in note values, relative to the project tempo). This determines how long it takes for the playhead to move across the step, whether or not it is active. For information about the step rates, see Change the musical length of a pattern.
Skip: Tap a step to turn skipping on or off. When skipping is on, the step is skipped and playback moves immediately to the next step, in effect shortening the row by the duration of the skipped step.
Edit modes for note rows
Velocity/Value: Drag vertically in the step to set the velocity value from 1 to 127. Velocity typically controls the loudness of the note attack, but can control other parameters depending on the parameter mapped to Velocity for the patch.
Gate: Drag vertically in the step to set the gate value as a percentage of the step. The gate value shortens the note length to less than the duration of the step.
Note: Drag vertically in the step to set the note value from –12 to 12 semitones, transposing the pitch of the step in notes.
When you change the pitch of a step in a fixed-pitch note row, the row header label changes to Melodic to indicate that the row contains multiple pitches.
Octave: Drag vertically in the step to set the octave value from –2 to 8 octaves, transposing the pitch of the step in octaves.
Note Repeat: Drag vertically in the step to set the note repeat value from 1 to 16. Note Repeat controls how often the note repeats for the duration of the step. In the inspector, you can also set the velocity ramp, velocity curve, and distribution of the note repeat for each step. See Edit step settings.
Edit modes for automation rows
There is only one edit mode specific to automation rows:
Value: Drag vertically to set the value for the automation parameter controlled by the row. The value range depends on which parameter the row is set to control.
Note: Tapping the Velocity/Value button sets the edit mode for note rows to velocity, and to the automation value for automation rows. In row headers, Velocity appears in the Edit Mode menu for note rows only.
View and edit multiple edit modes for a row using subrows
You can view and edit multiple edit modes for a row using subrows. When you tap the subrow disclosure arrow in the row header, a default set of subrows, each with its own edit mode, appears. When you add a subrow, it defaults to the next available edit mode for that row type. Two subrows of a row cannot have the same edit mode.
Choose the edit mode for the pattern
The Edit Mode buttons are located in the middle of the Step Sequencer menu bar. They are arranged in two rows, of which only one is visible at a time. Use the Page Switch button ![]() to switch between the two rows.
to switch between the two rows.
Tap the corresponding Edit Mode button in the Step Sequencer menu bar.
If the button is not visible, tap the Page Switch button to show the other row of buttons.
Change edit mode values for steps in the grid
In Logic Pro, in the Step Sequencer menu bar, tap an Edit Mode button.
By default, each step shows the current value for the selected mode. You can change the display of step values in the step grid.
In the step grid, edit the value of each step.
For most edit modes (except On/Off , Tie, Loop, and Skip), you edit the value by dragging vertically in the step. The value appears above the step as you drag. Some edit modes have only on and off states, rather than a range of values. In this case, tapping the step switches between the two states. For Loop Start/End, tapping a step sets the loop start or loop end position (whichever is closer) for that step.
Create ramped values across steps
In Logic Pro, drag across the steps you want to include in a ramp.
Show subrows for a row
You can view and edit multiple edit modes for a row at the same time using subrows.
In Logic Pro, tap the subrow disclosure arrow on the left side of the row header.

By default, several subrows appear below the row, depending on the row type.
You can add subrows and change the edit mode for a subrow.
Change the edit mode for a subrow
In Logic Pro, choose a new edit mode from the Edit Mode menu, located in the upper-right area of the subrow header.

Add a subrow
When you add a subrow, it defaults to the next available edit mode for that row type. Two subrows of one row cannot have the same edit mode.
In Logic Pro, tap the More button
 on the left side of a subrow header, then tap Add Subrow.
A subrow appears below the subrow, set to the next available edit mode for the row.
Tap the Edit Mode menu in the upper-right area of the subrow header, then choose an edit mode for the subrow.
The steps in the subrow show the values for the selected edit mode.
Delete a subrow
In Logic Pro, tap the More button
on the left side of a subrow header, then tap Remove Subrow.
Download this guide: PDF