Audio Devices settings in Logic Pro for iPad

Audio devices
These settings determine what audio device Logic Pro for iPad uses to record audio signals in your project and what audio device it uses to play back the audio signal from your project.
The visibility of these settings depends on what audio devices are connected to your iPad via cable, Bluetooth, or Wi-Fi and what you’ve selected.
Autoselect Audio Devices: Tap the switch to turn autoselect on or off. The status of the switch determines how audio devices are selected:
On: Connecting an audio device to your iPad automatically selects that device as the input and output device.
The Input and Output pop-up menus below the switch are read-only, listing the devices that are in use.
Off: You can choose any device from the Input and Output pop-up menus.
If a previously selected audio device is disconnected, the Input and Output pop-up menus switch to iPad Microphone and Speaker respectively, displayed in parentheses.
Input pop-up menu: Choose one of the available options as the audio input device:
iPad Microphone: Uses the iPad’s built-in microphones with the microphone orientation selected in the iPad Microphone pop-up menu.
Connected audio interface: If a supported audio interface is connected to your iPad, its name is listed in the menu.
Note: The Input option is not displayed if AirPlay Multi-Destination is selected as the Output device.

Output pop-up menu: Choose one of the available options as the audio output device to play back your project.
Speaker: The built-in iPad speakers are selected by default.
Connected audio interface: If a supported audio interface is connected to your iPad, its name is listed in the menu.
Note: If Autoselect Audio Devices at the top of the pane is off, a connected Bluetooth headset, such as AirPods Pro, is not listed as an output device in the Output pop-up menu. You have to choose AirPlay Single Destination or AirPlay Multi-Destination from the Output menu, tap the Select AirPlay Device button
 , and select the Bluetooth device from there.
AirPlay Single Destination: When you tap the Select AirPlay Device button
, you can choose one available AirPlay destination (for example, your AirPods Pro) to play back your project.AirPlay Multi-Destination: When you tap the Select AirPlay Device button
, you can choose multiple AirPlay destinations (for example, your AirPods Pro and Apple HomePod speakers) to play back your project simultaneously on those devices.
Important: The audio output selection in Control Center on your iPad is restricted when Logic Pro is in the foreground (or in the background when Run in Background is turned on in General settings). When the iPad speaker or a non-AirPlay device is selected in Audio Devices settings in Logic Pro, you can only switch to an AirPlay device in Control Center.
iPad Microphone pop-up menu: Choose one of the five options that determine the microphone orientation and polar pattern. The available options depend on the iPad model.
Top - Omnidirectional: Mono signal.
Back - Subcardioid: Mono signal.
Back - Stereo: Stereo signal.
Front - Cardioid: Mono signal.
Front - Stereo: Stereo signal.
The selection is saved when you switch to an external audio device and then back to your iPad microphone.
Note: Changing the microphone orientation can affect the input format of the channel strips that use an iPad microphone as their input. If you need to adjust the selection, you can open the Audio Devices settings directly from the Input dialog of a channel strip using the Microphone Orientation Setup command. See Set channel strip input format in Logic Pro for iPad.
Input Gain slider: Set the input level of the currently selected audio input device.
The Input Gain slider is not displayed if AirPlay Multi-Destination is selected as the Output device or any audio device that provides its own input gain control.
Tip: Have the Mixer with the record-enabled channel strip visible in the background to see the channel strip meter while adjusting the Input Gain slider.
AirPlay devices
When playing back your project, you can send the audio signal wirelessly from your iPad to any device that supports AirPlay (computer, speakers, TV, and so on). When you choose AirPlay Single Destination or Airplay Multi-Destination from the Output pop-up menu, a button appears that lets you select one or multiple AirPlay destinations.

Select AirPlay Device button: Tap the blue AirPlay button
to open the AirPlay dialog, where you can choose any available AirPlay destinations on your network.
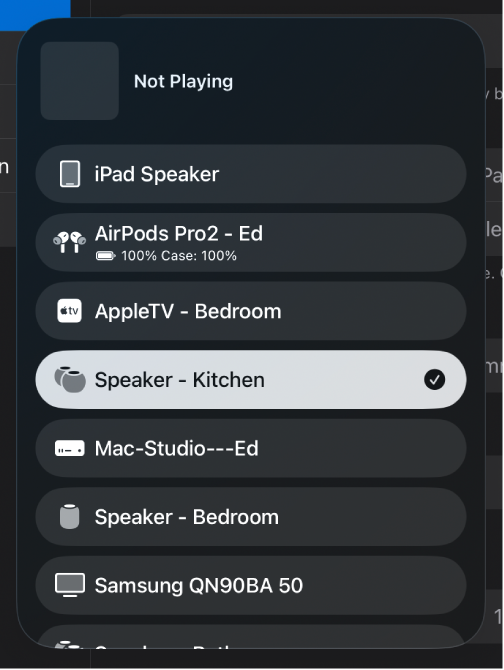
Note: With AirPlay Multi-Destination selected, you can tap multiple destinations in the AirPlay dialog. Each selected device shows a checkbox and a volume slider to adjust the playback volume for each destination (if supported by the device).

Multichannel audio devices
When you select a connected audio interface in the Output pop-up menu that has more than one stereo output channel, two additional options become available.

Stereo Output pop-up menu: The menu lists all the stereo output channels available on the selected device. The stereo output channel strip in your project is routed to the output channel you choose from this menu.
Mirroring: When you choose an output channel other than channel 1/2 from the Stereo Output pop-up menu, this switch becomes available. When you turn on mirroring, the stereo output channel strip is routed to output channel 1/2 in addition to the output channel you choose from the Stereo Output pop-up menu.

I/O buffer size
The I/O buffer size setting represents a compromise between CPU performance and low latency (delay). You might change those settings during the production, depending on whether you’re recording or mixing.
I/O Buffer Size pop-up menu: Determines the size of the buffer used by the audio device for both input and output.
Tip: Considerations for choosing the I/O buffer size:
During recording of audio tracks and software instrument tracks, the musician is monitoring through Logic Pro (with software monitoring turned on), and any noticeable delay caused by latency can negatively impact their performance. Setting the I/O buffer to the smallest amount minimizes the monitoring delay but also places a higher strain on your iPad’s processor.
The more processor-intensive plug-ins you use in your project, the higher the demand on your iPad’s processor during playback, which begins to affect playback in the form of clicks, pops, and crackles in your audio. Setting the I/O buffer to a higher value allows you to use more plug-ins during mixing without overpowering the CPU.
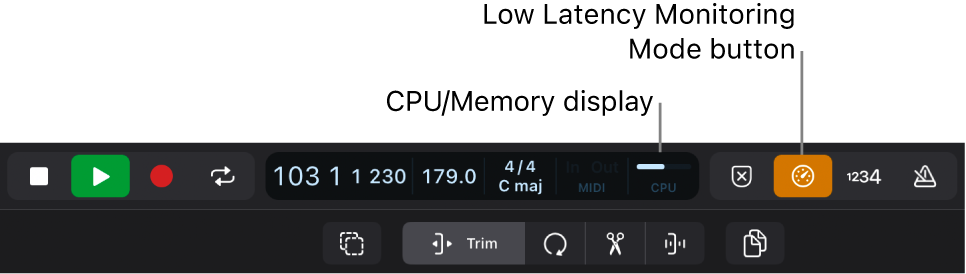
The CPU display in the control bar indicates how high the demand on your processor is when you play back or record in your project.
Tap the CPU/Memory display to show either CPU usage or memory usage.
You can tap the Low Latency Monitoring Mode button
 in the control bar to automatically turn off plug-ins in your project that cause high latency. See General Audio settings.
Download this guide: PDF