Overview of the Piano Roll Editor in Logic Pro for iPad
The main tasks in the Piano Roll Editor are viewing and editing the content of a MIDI region, which are MIDI events and region automation. It provides a close-up view of the software instrument track selected in the Tracks area, showing all its MIDI regions on that single track lane (the working area of the Piano Roll Editor). The MIDI notes, displayed as horizontal bars in a time grid and a specific color code, can be edited with various tools. The vertical lines in the working area (extending to the ruler on top) show the time position, while horizontal lines indicate pitch referenced to a vertical keyboard along the left edge. The Piano Roll Editor displays its own playhead, ruler, and cycle area linked to the Tracks area.
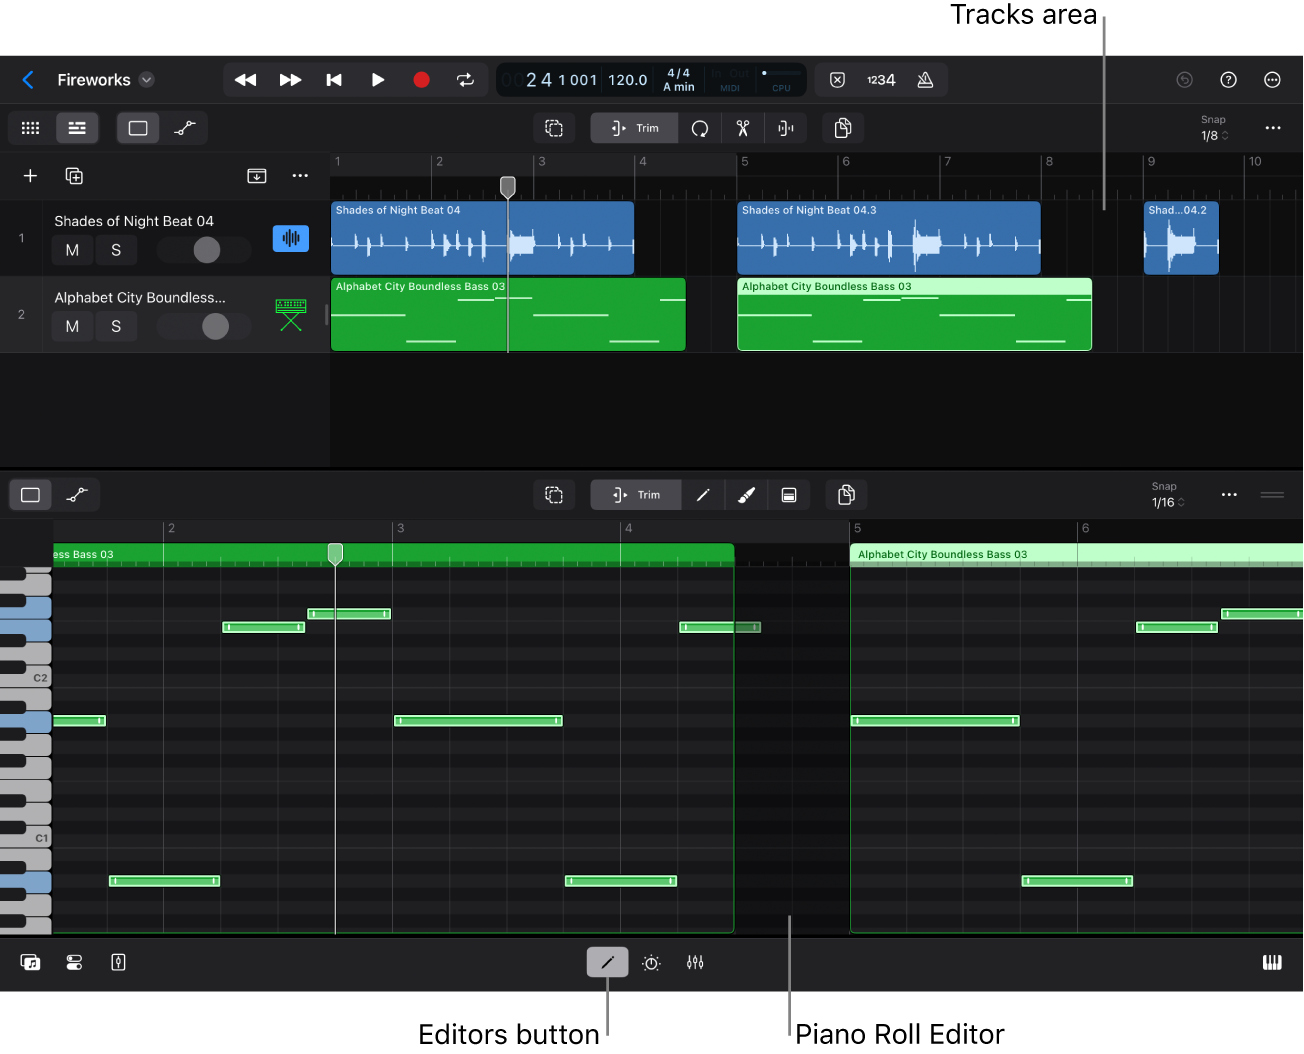
The main controls in the Piano Roll Editor are located in its menu bar above the working area.
View buttons: You can choose the Default View button
 (for editing notes) or the Automation View button
  (for editing region automation).
Function buttons: The function buttons in the center let you choose the edit modes. They change the functionality of gestures like tap, drag, touch and hold, and so on.
Trim button: Use the Trim button
 to trim and move or copy notes. This is the default mode that also lets you select individual notes or open their shortcut menus. In this mode you also open the shortcut menu of the working area.
Pencil button: Use the Pencil button
 to add and delete notes. It also lets you trim notes and copy notes.
Brush button: Use the Brush button
 to add a series of notes. It also lets you delete a note when you touch and hold it.
Velocity button: Use the Velocity button
 to edit note velocities.
Modifier buttons: Next to the function buttons are up to two additional buttons that modify the functionality of the current edit mode.
Select button: Use the Select button
 to select multiple notes or automation points. When selected, it hides the function buttons and other buttons on that menu bar.
To momentarily turn on Select mode, touch and hold the Select button (or press and hold the Shift key on your external keyboard), and then tap the notes you want to select. Release the button or Shift key to turn off Select mode.
Copy button: When the Copy button
 is selected, dragging any note copies the note instead of moving it.
To momentarily turn on Copy mode, touch and hold the Copy button (or press and hold the Option key on your external keyboard), and then drag the notes you want to copy. Release the button or Option key to turn off Copy mode.
Additional controls: On the right side of the menu bar is the Snap pop-up menu to set the Snap value, the More button
 to set various view settings, and the resize handle
  to resize the Editors area vertically.
Auto zoom and auto scroll
When you select one or more MIDI regions in the Tracks area and open the Piano Roll Editor, its working area auto zooms and auto scrolls to show the notes of the selected regions. With a single region selected, the working area ranges from the left border to the right border of the selected region. With multiple regions selected, the working area ranges from the left border of the first selected region to the right border of the last selected region.
With the Piano Roll Editor open, you can manually scroll and zoom the working area horizontally and vertically.
Show or hide the Piano Roll Editor
In the Tracks area menu bar, tap the Trim button
.Tap a MIDI region.
Tap the Editors button
in the middle of the view control bar.The Piano Roll Editor opens below the Tracks area.
To hide the Piano Roll Editor, do any of the following:
Tap the Editors button
.Double-tap the view control bar.
This gesture closes all areas except the Tracks area.
Swipe down from the top of the display to reveal the menu bar, tap View, and then choose Hide Editor (or press E on your external keyboard).
Resize the Piano Roll Editor vertically
Do any of the following:
On the right side of the Piano Roll Editor menu bar, drag the resize handle
(or the menu bar) up or down.Dragging it all the way down closes the Piano Roll Editor.
Tap the resize handle
to increase the view of the Piano Roll Editor to its maximum position (which minimizes the Tracks area to show only a single mini track).Tap the handle again to return the editor to its previous size.
Note: To hide the Tracks area completely, drag the resize handle all the way up.
Show note labels in the Piano Roll Editor
Tap the More button
on the right side of the Piano Roll Editor menu bar, then choose Show Note Labels.
When this option is selected, the horizontal note bars in the working area show their note pitch and note velocity (if the working area is zoomed in far enough).
Set note colors in the Piano Roll Editor
Tap the More button
on the right side of the Piano Roll Editor menu bar, then tap Set Note Color in the menu and choose one of three options:By Region Color: Colors notes to correspond with the color of the MIDI region.
By Velocity: Colors notes to show their MIDI note velocity.
The increasing velocity value from 1 to 127 is reflected by gradually changing colors from purple to blue, to green, to red.
By MIDI Channel: Colors notes to correspond with the MIDI channel value embedded in the note event.
Each MIDI channel has a dedicated color.
Preview notes in the Piano Roll Editor
In the Piano Roll Editor menu bar, tap the Trim button
or Velocity button , then touch and hold a note bar.To preview the note again, you have to tap outside to deselect it first, and then tap the note again.
The vertical keyboard on the left highlights the corresponding key of the selected note. You can also tap this keyboard to play notes.
Choose an edit mode in the Piano Roll Editor
In the Piano Roll Editor menu bar, tap any of the four function buttons: Trim
, Pencil , Brush , or Velocity .In addition, you can use the two modifier buttons, the Copy button
on the right (only available when the Pencil button or Brush button is selected) and the Select button on the left.
Important: Tapping the Select button ![]() deselects the active function button. Tap the Select button again to turn off Select mode.
deselects the active function button. Tap the Select button again to turn off Select mode.
Set a Snap value in the Piano Roll Editor
In the Piano Roll Editor menu bar, tap the Snap pop-up menu and choose a Snap value.
The Snap value in the Piano Roll Editor is independent of the Snap value set in Tracks view or Automation view.
Download this guide: PDF