- HoloLens1 10.0.17763.316 / HoloLens2 22621.1399
- Windows 10 SDK 10.0.19041.0 / 10.0.22621.0
- Unity 2021.3.35f1 (Built-in Render Pipeline / OpenXR 1.11.1 / MRTK 2.8.3 / DirectX 11 / Visual Studio 2022 MSVC v143)
- Unity 2021.3.35f1 (Built-in Render Pipeline / OpenXR 1.11.1 / MRTK 3.2.2 / DirectX 11 / Visual Studio 2022 MSVC v143)
Mixed Reality Feature Tool- OpenCV for Unity 3.0.0+
- EnoxSoftware/HoloLensCameraStream
The setup procedure for HoloLens projects using Unity and MRTK has changed significantly. The legacy Mixed Reality Feature Tool no longer functions on the latest Windows 11 environments.
To run this project, you must import the following assets:
- Unity OpenXR Plugin 1.14.3
- Microsoft Mixed Reality OpenXR Plugin 1.11.2
- Mixed Reality Graphics Tools 0.8.1
- MRTK3
Please install the packages in the following specific order to ensure all dependencies are resolved correctly:
- Unity OpenXR Plugin
- Add the following line to the
dependenciessection of themanifest.jsonfile:"com.unity.xr.openxr": "1.14.3",.
- Add the following line to the
- Microsoft Mixed Reality OpenXR Plugin
- Add the following line to the
dependenciessection of themanifest.jsonfile:"com.microsoft.mixedreality.openxr": "1.11.2",.
- Add the following line to the
- MRTK Graphics Tools
- Add the following line to the
dependenciessection of themanifest.jsonfile:"com.microsoft.mrtk.graphicstools.unity": "https://github.com/microsoft/MixedReality-GraphicsTools-Unity.git?path=/com.microsoft.mrtk.graphicstools.unity#v0.8.1",.
- Add the following line to the
- MRTK Core Definitions (com.microsoft.mrtk.core)
- Download the latest tarball package from the MRTK3 GitHub repository and import it using UPM's
Add package from tarball...option.
- Download the latest tarball package from the MRTK3 GitHub repository and import it using UPM's
- MRTK Input (com.microsoft.mrtk.input)
- Download the latest tarball package from the MRTK3 GitHub repository and import it using UPM's
Add package from tarball...option.
- Download the latest tarball package from the MRTK3 GitHub repository and import it using UPM's
- MRTK UX Core Scripts (com.microsoft.mrtk.uxcore)
- Download the latest tarball package from the MRTK3 GitHub repository and import it using UPM's
Add package from tarball...option.
- Download the latest tarball package from the MRTK3 GitHub repository and import it using UPM's
- MRTK Spatial Manipulation (com.microsoft.mrtk.spatialmanipulation)
- Download the latest tarball package from the MRTK3 GitHub repository and import it using UPM's
Add package from tarball...option.
- Download the latest tarball package from the MRTK3 GitHub repository and import it using UPM's
- MRTK Standard Assets (com.microsoft.mrtk.standardassets)
- Download the latest tarball package from the MRTK3 GitHub repository and import it using UPM's
Add package from tarball...option.
- Download the latest tarball package from the MRTK3 GitHub repository and import it using UPM's
- MRTK UX Components (com.microsoft.mrtk.uxcomponents)
- Download the latest tarball package from the MRTK3 GitHub repository and import it using UPM's
Add package from tarball...option.
- Download the latest tarball package from the MRTK3 GitHub repository and import it using UPM's
- MRTK UX Components (Non-Canvas) (com.microsoft.mrtk.uxcomponents.noncanvas)
- Download the latest tarball package from the MRTK3 GitHub repository and import it using UPM's
Add package from tarball...option.
- Download the latest tarball package from the MRTK3 GitHub repository and import it using UPM's
- Download the latest release unitypackage. HoloLensWithOpenCVForUnityExample.unitypackage
- Create a new project. (
HoloLensWithOpenCVForUnityExample)- Change the platform to
UWPin the "Build Settings" window.
- Change the platform to
- Import and setup the Microsoft Mixed Reality Toolkit.
(Recommend using MixedRealityFeatureTool) - Import the OpenCVForUnity.
- Select MenuItem[Tools/OpenCV for Unity/Open Setup Tools].
- Click the [Move StreamingAssets Folder] button.
- Leave the following files and delete the rest. ("StreamingAssets/OpenCVForUnity/objdetect/haarcascade_frontalface_alt.xml", "lbpcascade_ frontalface.xml")
- Clone HoloLensCameraStream repository.
- Copy the "HoloLensCameraStream/HoloLensVideoCaptureExample/Assets/CamStream/" folder to the "Assets/" folder.
- Import the HoloLensWithOpenCVForUnityExample.unitypackage.
- Add the "Assets/HoloLensWithOpenCVForUnityExample/*.unity" files to the "Scenes In Build" list in the "Build Settings" window.
- Configure settings in the "Project Settings" window.
- Add Define Symbols: the following to
Scripting Define Symbolsdepending on the XR system used in your project; Legacy built-in XR:BUILTIN_XR; XR Plugin Management (Windows Mixed Reality):XR_PLUGIN_WINDOWSMR; XR Plugin Management (OpenXR):XR_PLUGIN_OPENXR. - Enable
WebCamCapabilties in Publishing settings tab.
- Add Define Symbols: the following to
- (Optional) Setup a performance environment suitable for Holorens. (See https://docs.microsoft.com/en-us/windows/mixed-reality/develop/unity/recommended-settings-for-unity)
- Build the project: You can now build the Unity project, which generates a Visual Studio Solution (which you will then have to also build). With the Build Settings window still open, click Build. In the explorer window that appears, make a new folder called
App, which should live as a sibling next to the 'Assets` folder. Then click Select Folder to generate the VS solution in that folder. Then wait for Unity to build the solution. - Open the VS Solution: When the solution is built, a Windows explorer folder will open. Open the newly-built VS solution, which lives in
App/HoloLensWithOpenCVForUnityExample.sln. This is the solution that ultimately gets deployed to your HoloLens. - Configure the deploy settings: In the Visual Studio toolbar, change the solution platform from
ARMtox86if you are building for Hololens1 or toARM64if you are building for Hololens2; Change the deploy target (the green play button) toDevice(if your HoloLens is plugged into your computer), orRemote Machine(if your HoloLens is connected via WiFi). - Run the app: Go to Debug > Start Debugging. Once the app is deployed to the HoloLens, you should see some confirmation output in the Output window.
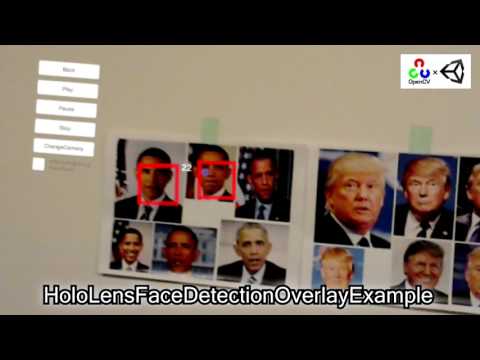
- (Print the AR marker "CanonicalMarker-d10-i1-sp500-bb1.pdf" on an A4 size paper)
- Download the latest release unitypackage.
- Create a new project. (
HoloLensWithOpenCVForUnityExample) - Import the Microsoft Mixed Reality Toolkit.
- Add MRTK2 (Mixed Reality Toolkit - Mixed Reality Toolkit Foundation) and OpenXR(Platform Support - Mixed Reality OpenXR Plugin) to the project
using "Mixed Reality Feature Tool". - Follow the MRTK2 configuration dialog to set up the project. (XR System: OpenXR)
- Add MRTK2 (Mixed Reality Toolkit - Mixed Reality Toolkit Foundation) and OpenXR(Platform Support - Mixed Reality OpenXR Plugin) to the project
- Import the OpenCVForUnity.
- Import the HoloLensCameraStream.
- Import the HoloLensWithOpenCVForUnityExampleMRTK2.unitypackage.
- Add the "Assets/HoloLensWithOpenCVForUnityExample/*.unity" files to the "Scenes In Build" list in the "Build Settings" window.
- Configure settings in the "Project Settings" window.
- Add
XR_PLUGIN_OPENXRto the list of Define Symbols. - Enable
WebCamCapabilties in Publishing settings tab.
- Add
- Build the project; open it in VS2022, set the deployment target to
ARM64and deploy it to the Hololens2 actual device.
- Download the latest release unitypackage.
- Create a new project. (
HoloLensWithOpenCVForUnityExample) - Import the Microsoft Mixed Reality Toolkit.
- Add MRTK3 (MRTK3 - MRTK Input, MRTK UX Components, MRTK UX Components (Non-Canvas)) and OpenXR(Platform Support - Mixed Reality OpenXR Plugin) to the project
using "Mixed Reality Feature Tool". - Set up the MRTK3. (XR System: OpenXR)
- Add MRTK3 (MRTK3 - MRTK Input, MRTK UX Components, MRTK UX Components (Non-Canvas)) and OpenXR(Platform Support - Mixed Reality OpenXR Plugin) to the project
- Import the OpenCVForUnity.
- Import the HoloLensCameraStream.
- Import the HoloLensWithOpenCVForUnityExampleMRTK3.unitypackage.
- Add the "Assets/HoloLensWithOpenCVForUnityExample/*.unity" files to the "Scenes In Build" list in the "Build Settings" window.
- Configure settings in the "Project Settings" window.
- Add
XR_PLUGIN_OPENXRto the list of Define Symbols. - Enable
WebCamCapabilties in Publishing settings tab.
- Add
- Build the project; open it in VS2022, set the deployment target to
ARM64and deploy it to the Hololens2 actual device.
| Project Assets | Build Settings |
|---|---|
 |
 |
| Player Settings |
|---|
 |


